Well we know we have to change the way the intermediate is setup. I took apart the doner freehub I had and started by welding 3/4" collars inside so that it could be mounted on the axle. I may have to find another freehub due to problems in welding. We'll see what happens in the next few days.
Monday, June 26, 2006
Sunday, June 25, 2006
Problems
Have removed intermediate assembly. We could not keep the short chain on. Was going to pickup a new 3-ring front sprocket on Friday but due to an unfortunate incident with my wife's truck breaking down and a unexpected costly repair I'll be delayed a few days. The smaller front sprocket will give me the low end torque I need. I'm considering taking apart the freehub that was the intermediate and mounting it directly to the axle then figure out a way to get the derailer mounted. I've already mounted a smaller sprocket on the left-hand side going to the rear wheel. This helped alot with the low end. Hopefully this week I'll get things worked out.
The other problem is my steering is binding for some reason. I will need to put a bell crank to get some ackerman worked into the steering. One of the problems is the disc's are flexing. We'll have to make another setup to replace the disc's. Probably a 'L' shaped piece that will have more strength.
Tuesday, June 20, 2006
Steering and TEST DRIVE!

 We finished up the steering setup after replacing the bolts on the tierod ends. The discs are not permenant but worked very well to help with alignment. We took two shorter pieces of 1/2" square tubing and clamped them together to tie the two sides together then eventually tacked them together.
We cut the handle portion off of one set of the handle bars long enough to have the shifter and brake assembly. We took an old set of handle bars and cut then slit the end to fit over the new, shorter handle bar. This was done to allow the handle bar clamp to hold the new bar.


After this I took my first test ride on the machine. The first thing I noticed was that it pedaled like it was in high gear. The next thing I noticed was how smooth this thing moved. I eased out of the shop and down into the yard. The steering was cool but may need some tweaking. Don't get me wrong it handled great but could be adjusted. The problem came when I started putting the pressure to the pedals I started getting a popping. This came from what I learned later was the chain that tied the intermediate assembly to the axle. I did some adjusting to the axle to line the sprockets up and adjusted the intermediate. The next test produced the same results. This isn't the big problem. I can work through that. The problem is right now I have everything set in low gear and I'm still having problems pedaling. I believe my problem may be with the small gear coming off the intermediate to the large gear on the original bike setup. I think we're going to have to remove the large sprockets down to ones the size of the sprocket on the middle of the axle. I'll have to find another doner bike to pull the sprocket from. Looks like its back to the thrift store.
Sunday, June 18, 2006
STEERING!!
I've finally reached the point at which I can start designing the steering setup. Getting an Ackerman effect I believe is going to be important for this bike. Since this is not going to be a high speed machine I need to be able to make my turns with as much ease as possible. I've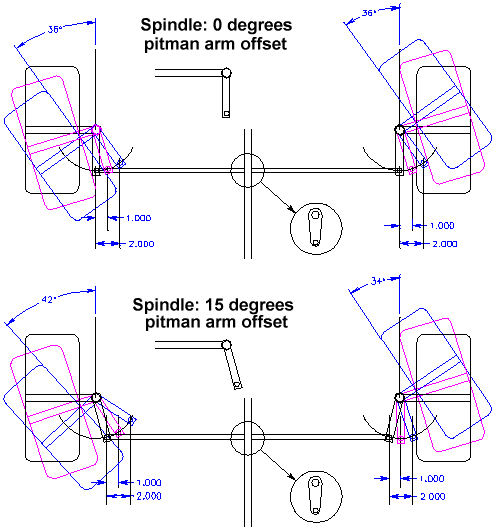 contemplated using a bellcrank inbetween the the pivot points. Although after reading several different posting online I may have a slight bit of ackerman built in by the way I have positioned the tabs that the steering arms connect by. I'll post pictures later of these mounts. I found this picture on a site that may have my steering figured out as far as the ackerman stuff. Once I have the two sides tied together then I'll work on the handle bars.
Wednesday, June 14, 2006
Another drivetrain update
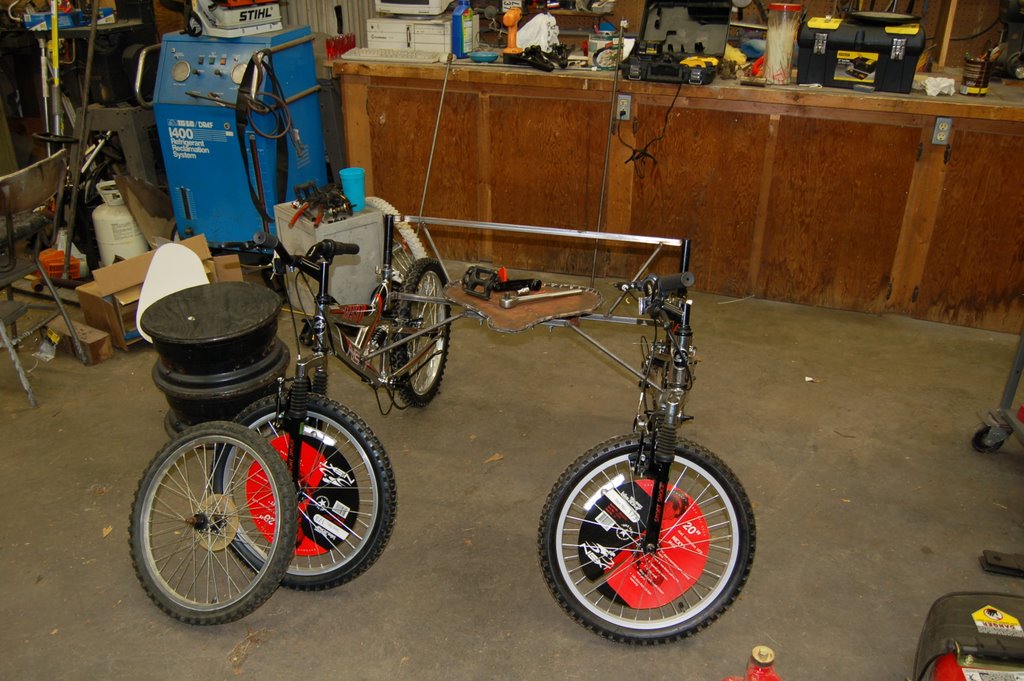
 After a intermediate assembly modification and a weld failure the intermediate assembly is almost complete. There's a couple of loose end and some trimming but its almost there.
We pulled the bike down from the table to start sorting out the steering. A lot of my ideas have flown out the window. Between my dad and I we've managed to sort out a couple that just might turn out for the best. This is and continues to be a design as we go project.
The best part about this stage was that before we pulled the bike down we tied the two drive wheels together by tacking the axle into its carrier and running the wheels. It was so cool to see both the wheels moving. Once we put it on the ground we checked the axle stability and found a weakness in the intermediate assembly and the axle itself. To our disappointment but not surprise the axle flexed. Not to worry though we did take that into consideration We have a pillow block bearing that we will use to brace the axle.
It's getting close and I'm hoping to have it road worthy by July when we go to Myrtle Beach.
Monday, June 12, 2006
Drivetrain Update #3
The axle is pretty much finalized. We cut off the the excess axle so it now has a cleaner look. This ties the drivetrain together more. A hole was drilled between a 1/8 and 1/4" into the axle. I'm going to use a longer set screw in the crank so that even if it backs out, which I hope it won't, it won't slip.
I've chosen to use a a derailer from a doner bike. Now I know some will say that is stupid but this is a budget build. I take parts where I can get'em. I've been cleaning up the part and hopefully I'll get in on in the next day or so.
I bought a chain and breaker at Walmart so I'll be able to string the main chain in the next day or so. Again with the budget build I have a couple of chains soaking in kerosene and motor oil. The best one will be used for the intermediate link unless I have enough chain left over from the main.
I think I may have come up with a way to make my steering arms work the way I want. We'll see how well that will work in the next couple of day.
Sunday, June 11, 2006
Drivetrain Update #2
 We temporarily have the drivetrain in place. After wroking with an alignment problem with the axle we were working forward until another alignment issue came up. The fron tires were farther apart than the rear. We were very careful to check our measurements. We had to cut the seat support going to the frame then pull it back together.
The flange bearing on the left-hand frame is now centered as can be now. The p icture here shows the bearing, the mount tabs and the carrier sprocket.
The bike is starting to take shape now. I need to get chains before I can weld the axle into the old pedal.

Drivetrain Update
We went yesterdya to get the components for the drivetrain. Grainger didn't have everything instock and would take a week to get. The main thing was the axle. We ended up going to Northern Tool and found a piece of round bar that was perfrect. I also picked up tie rod ends for the steering. I went back to Grainger and picked up the bearings and collars that were needed. The round bar from Nothern was much cheaper that the linear bearing shaft from Grainger.
We've managed to mount the shaft temporarily into the frame. I've cut off the right-hand frames inner pedal leaving only the mounting portion. I cut the sprocket from the inner pedal on the left-hand frame. When drilling through the pedal assembly the sprocket was warped. I've managed to straighten some but may have to replace. The carrier sprocket has been mounted to the collars and ready to be set once the end of the axle is welded to the mount adapter on the inner right side.
The intermediate assembly is going to be changed to allow adjustment of the carrier sprocket chain. Any slack will be taken up in the front chain by the derailer.
I will try to post pictures tonight.
Friday, June 09, 2006
Boom and extras
We got the boom installed after several structural modifications. We also got the first version of the intermediate gear assembly mocked up. There is still some adjustment to do before the finall mounting. It still looks a little odd but it's getting close.
I'm reconsidering the three chain ring on the front. As it stands now I'm going to have 42 different speeds. Any more will have some duplicates and also be complicated.
I'm going tomorrow to get the materials from Grainger to build the axle to connect the two bike drivetrains. The axle is 3/4 linear bearing shaft combined with some flange bearing and pillow block. Hopefully this will tie together correctly.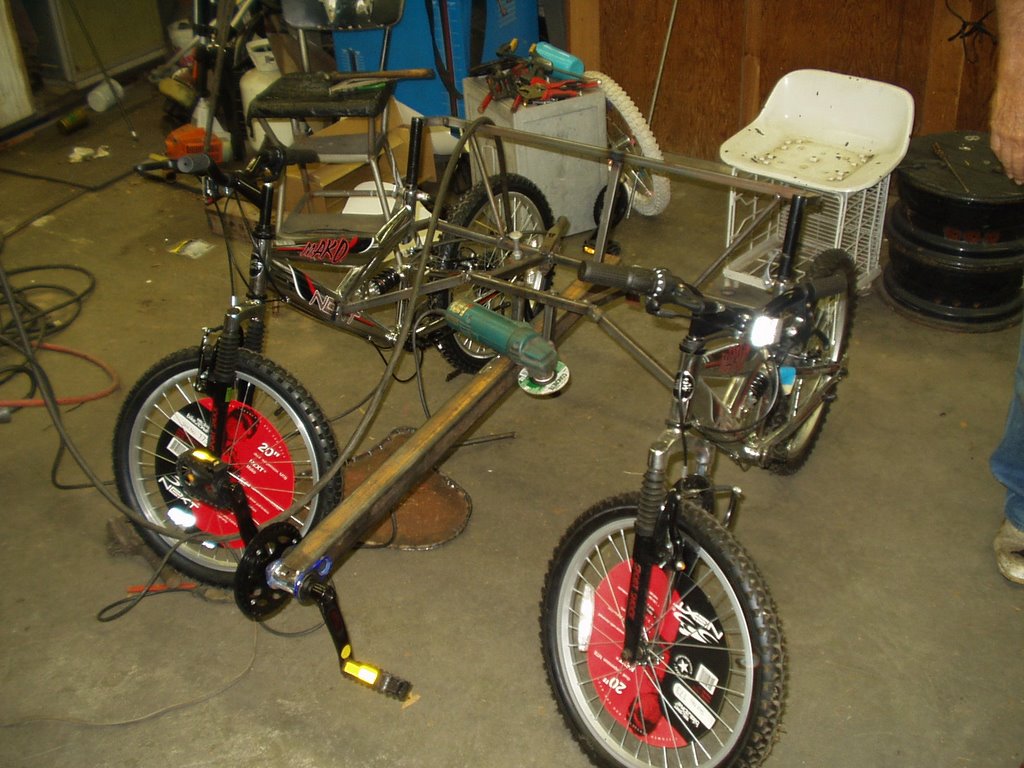


Tuesday, June 06, 2006


The frame
Nine months of planning, design and experimenting got me nowhere. One saturday afternoon at Walmart and about $85 got me so far down the road it wasn't funny. I purchased two identical 20" BMX boys bikes with full suspension. These made up the majority of the frame. The next part was connecting the two frames. This was achieved with 3/4" thin walled square tubing. We designed a seat base then re-enforce the edges with round bar. We then welded hinges to the seat and bolted them to the frame.
Subscribe to:
Comments (Atom)


